SY.Bsc.Cs Sem-4 Based on Mumbai Unversity
Android Application Development SEM-4 (Unit-1,2,3)Question Answers:-

(1) Explain the following terms in 2-3 lines. 1)Gradle 2) Layout 3) ANR 4) Manifest file Ans:-
Gradle:
Gradle is a build automation tool used in Android development. It helps manage dependencies, compile code, and package applications into APK or AAB formats. Gradle allows customization through Groovy or Kotlin-based build scripts.
Layout:
A layout in Android defines the structure of the user interface (UI). It determines how UI components such as buttons, text fields, and images are arranged on the screen. Android supports different layout types like LinearLayout, RelativeLayout, and ConstraintLayout.
ANR (Application Not Responding):
ANR occurs when an Android application becomes unresponsive for more than 5 seconds due to blocking operations on the main thread. This usually happens when a long-running task like database queries or network requests is performed on the UI thread instead of a background thread.
Manifest File:
The AndroidManifest.xml file contains essential information about an Android application. It declares components like activities, services, broadcast receivers, and permissions required by the app. It also specifies hardware and software requirements, such as camera access or minimum API level.
(2)How is Checkbox different from RadioButton in android? Write the XML tag for using Checkbox. Ans:

(3)Write a note on history and evolution of android.
Introduction:
Android is an open-source mobile operating system developed by Android Inc. and later acquired by Google in 2005. It was officially released in 2008, and since then, it has evolved with multiple versions, improving security, performance, and user experience.

|

Codename :
Android 11's codename was "Red Velvet Cake".Android 10's codename was "Quince Tart" - Android 12's codename was "Snow Cone".
- Android 12L's codename was "Snow Cone v2".
- Android 13's codename was "Tiramisu".
- Android 14's codename was "Upside Down Cake".
(4) Write a note on kotlin. Ans:
Kotlin is a modern, statically typed programming language developed by JetBrains and officially supported by Google for Android development. It is designed to be concise, expressive, and interoperable with Java, making it an excellent choice for Android applications.
Key Features of Kotlin:
Key Features of Kotlin:
- Concise Syntax – Reduces boilerplate code compared to Java.
- Null Safety – Helps prevent
NullPointerExceptionby distinguishing nullable and non-nullable types. - Interoperability with Java – Allows using Java and Kotlin code together within the same project.
- Lambdas and Higher-Order Functions – Supports functional programming for cleaner and more readable code.
- Coroutines – Enables asynchronous programming with lightweight threads.
- Smart Type Casting – The compiler automatically detects and casts types when necessary.
Why Kotlin for Android Development?
- Google officially supports it for Android apps.
- More readable and concise compared to Java.
- Improves app stability and reduces runtime crashes.
- Compatible with existing Java-based projects.
(5) Explain kotlin operators. Ans:
Operators in Kotlin are special symbols used to perform operations on variables and values. Kotlin supports different types of operators:
1. Arithmetic Operators (Used for mathematical calculations)
| Operator | Description | Example |
|---|---|---|
+ |
Addition | val sum = 5 + 3 // 8 |
- |
Subtraction | val diff = 5 - 3 // 2 |
* |
Multiplication | val product = 5 * 3 // 15 |
/ |
Division | val quotient = 10 / 2 // 5 |
% |
Modulus (Remainder) | val remainder = 10 % 3 // 1 |
2. Relational (Comparison) Operators (Used for comparison, returns true or false)
| Operator | Description | Example |
|---|---|---|
== |
Equal to | 5 == 5 // true |
!= |
Not equal to | 5 != 3 // true |
> |
Greater than | 10 > 5 // true |
< |
Less than | 2 < 5 // true |
>= |
Greater than or equal to | 5 >= 5 // true |
<= |
Less than or equal to | 3 <= 5 // true |
3. Logical Operators (Used for logical operations)
| Operator | Description | Example |
|---|---|---|
&& |
Logical AND (Both conditions must be true) | (5 > 2) && (10 > 3) // true |
| ` | ` | |
! |
Logical NOT (Reverses condition) | !(5 > 2) // false |
4. Assignment Operators (Used for assigning values)
| Operator | Example | Equivalent To |
|---|---|---|
= |
var a = 5 |
Assigns value |
+= |
a += 2 |
a = a + 2 |
-= |
a -= 3 |
a = a - 3 |
*= |
a *= 4 |
a = a * 4 |
/= |
a /= 2 |
a = a / 2 |
%= |
a %= 2 |
a = a % 2 |
5. Increment & Decrement Operators (Used to increase or decrease a variable's value)
| Operator | Description | Example |
|---|---|---|
++ |
Increments by 1 | a++ or ++a |
-- |
Decrements by 1 | a-- or --a |
6. Bitwise Operators (Used for bit-level operations)
| Operator | Description | Example |
|---|---|---|
shl |
Left shift | 4 shl 2 // 16 (4 * 2^2) |
shr |
Right shift | 16 shr 2 // 4 (16 / 2^2) |
and |
Bitwise AND | 5 and 3 // 1 |
or |
Bitwise OR | 5 or 3 // 7 |
xor |
Bitwise XOR | 5 xor 3 // 6 |
Example Program in Kotlin
fun main() {
    val a = 10
    val b = 5
    println("Sum: ${a + b}")  // Output: Sum: 15
    println("Is a greater than b? ${a > b}") // Output: true
    println("Logical AND: ${(a > b) && (b > 2)}") // Output: true
}
(6) What do you understand by variables? Explain how to create variables in kotlin?
Ans:
A variable is a named storage location in memory that holds data. It allows programmers to store and manipulate values throughout the execution of a program. In Kotlin, variables are strongly typed and can store different types of data, such as integers, floating-point numbers, characters, and strings.
Types of Variables in Kotlin
Kotlin provides two main types of variables:
-
Immutable (Read-Only) Variables –
val- Declared using
val. - Once assigned, the value cannot be changed.
- Example:
val pi = 3.14 // Read-only variable
- Declared using
-
Mutable (Changeable) Variables –
var- Declared using
var. - The value can be modified later.
- Example:
var age = 25  // Mutable variable
age = 30      // Allowed
- Declared using
Example Code for Variable Declaration
fun main() {
    val name: String = "John"  // Immutable variable
    var score: Int = 90        // Mutable variable
    score += 10                // Changing value of mutable variable

    println("Name: $name")
    println("Updated Score: $score")
}
Key Points to Remember:
- Use
valfor constants and values that should not change. - Use
varwhen you need a variable whose value will change. - Kotlin automatically infers types, so explicit type declarations are optional.
(7) Explain object oriented programming in kotlin. Ans:
Introduction
Object-Oriented Programming (OOP) is a programming paradigm that focuses on organizing code using objects and classes. Kotlin fully supports OOP principles, making it a robust language for Android development.
Key OOP Concepts in Kotlin
-
Classes and Objects:
- A class is a blueprint for creating objects.
- An object is an instance of a class.
- Example:
class Car(val brand: String, val model: String) {
    fun displayInfo() {
        println("Car: $brand $model")
    }
}
val myCar = Car("Toyota", "Camry")
myCar.displayInfo()
-
Encapsulation:
- Encapsulation is the practice of restricting direct access to certain details of an object.
- This is achieved using private, protected, and public visibility modifiers.
- Example:
class BankAccount(private var balance: Double) {
    fun deposit(amount: Double) {
        balance += amount
    }
    fun getBalance(): Double {
        return balance
    }
}
val account = BankAccount(1000.0)
account.deposit(500.0)
println(account.getBalance())  // Output: 1500.0
-
Inheritance:
- Inheritance allows a child class to inherit properties and methods from a parent class using the
openkeyword. - Example:
open class Animal {
    fun eat() {
        println("This animal is eating")
    }
}
class Dog : Animal() {
    fun bark() {
        println("Dog is barking")
    }
}
val myDog = Dog()
myDog.eat()
myDog.bark()
- Inheritance allows a child class to inherit properties and methods from a parent class using the
-
Polymorphism:
- Polymorphism allows methods to be overridden or behave differently based on the object.
- Example:
open class Animal {
    open fun makeSound() {
        println("Some generic animal sound")
    }
}
class Cat : Animal() {
    override fun makeSound() {
        println("Meow")
    }
}
val myCat: Animal = Cat()
myCat.makeSound()  // Output: Meow
-
Abstraction:
- Abstraction hides implementation details and only exposes essential functionalities using
abstractclasses or interfaces. - Example using an abstract class:
abstract class Vehicle {
    abstract fun startEngine()
}
class Car : Vehicle() {
    override fun startEngine() {
        println("Car engine started")
    }
}
val car = Car()
car.startEngine()
- Abstraction hides implementation details and only exposes essential functionalities using
OOP in Kotlin provides a structured and reusable way to write clean and maintainable code. It helps in building modular applications by combining encapsulation, inheritance, polymorphism, and abstraction.
(8) Write a note on Delegates. Ans:
In Kotlin, Delegates are a powerful feature that allows objects to delegate functionality to another helper object. Instead of implementing a property or function directly in a class, Kotlin allows you to delegate its behavior to another class, making the code more reusable and modular.
Types of Delegation in Kotlin
-
Property Delegation
- Allows a property to delegate its getter and setter behavior to another object.
- Common property delegates include
lazy,observable, andnotNull.
Example:
class Example { var name: String by lazy { "Default Name" } } fun main() { val obj = Example() println(obj.name) // Output: Default Name } -
Observable Delegation
- Tracks changes in a property and executes a function whenever the value is modified.
Example:
import kotlin.properties.Delegates class Person { var age: Int by Delegates.observable(18) { _, old, new -> println("Age changed from $old to $new") } } fun main() { val person = Person() person.age = 25 // Output: Age changed from 18 to 25 } -
Interface Delegation
- Allows one class to implement an interface by delegating its functions to another class.
Example:
interface Printer {
    fun printMessage()
}

class RealPrinter : Printer {
    override fun printMessage() {
        println("Printing message...")
    }
}

class PrinterDelegate(private val printer: Printer) : Printer by printer

fun main() {
    val delegatedPrinter = PrinterDelegate(RealPrinter())
    delegatedPrinter.printMessage()  // Output: Printing message...
}
Advantages of Delegates
- Reduces boilerplate code by reusing functionalities.
- Encourages code reusability and modular design.
- Enhances readability and maintainability of code.
- Provides built-in property delegates like
lazy,observable, andnotNull.
Kotlin Delegates help simplify code by outsourcing common functionality to other classes or built-in delegates, making development efficient and scalable.
(9) Explain declaring and calling function in kotlin. Ans: 1. Declaring a Function in Kotlin
A function in Kotlin is declared using the fun keyword, followed by the function name, optional parameters in parentheses, and the function body. The function can return a value or be Unit (which is equivalent to void in other languages).
Syntax:
fun functionName(parameter1: Type, parameter2: Type): ReturnType {
    // Function body
    return someValue // if the return type is not Unit
}
Example:
fun greet(name: String): String {
    return "Hello, $name!"
}
- Here,
greetis the function name,nameis the parameter, andStringis the return type.
2. Calling a Function in Kotlin
A function is called by using its name followed by parentheses. If the function takes parameters, you pass the arguments inside the parentheses.
Syntax:
functionName(argument1, argument2)
Example:
fun main() {
    val message = greet("Alice")  // Calling the greet function
    println(message)              // Output: Hello, Alice!
}
- In this example, the function
greetis called with the argument"Alice", and its return value is stored in themessagevariable, which is then printed.
Key Points:
- Functions are declared using
fun. - The function can take parameters and return a value.
- To call a function, use its name followed by parentheses and provide arguments for the parameters if needed.
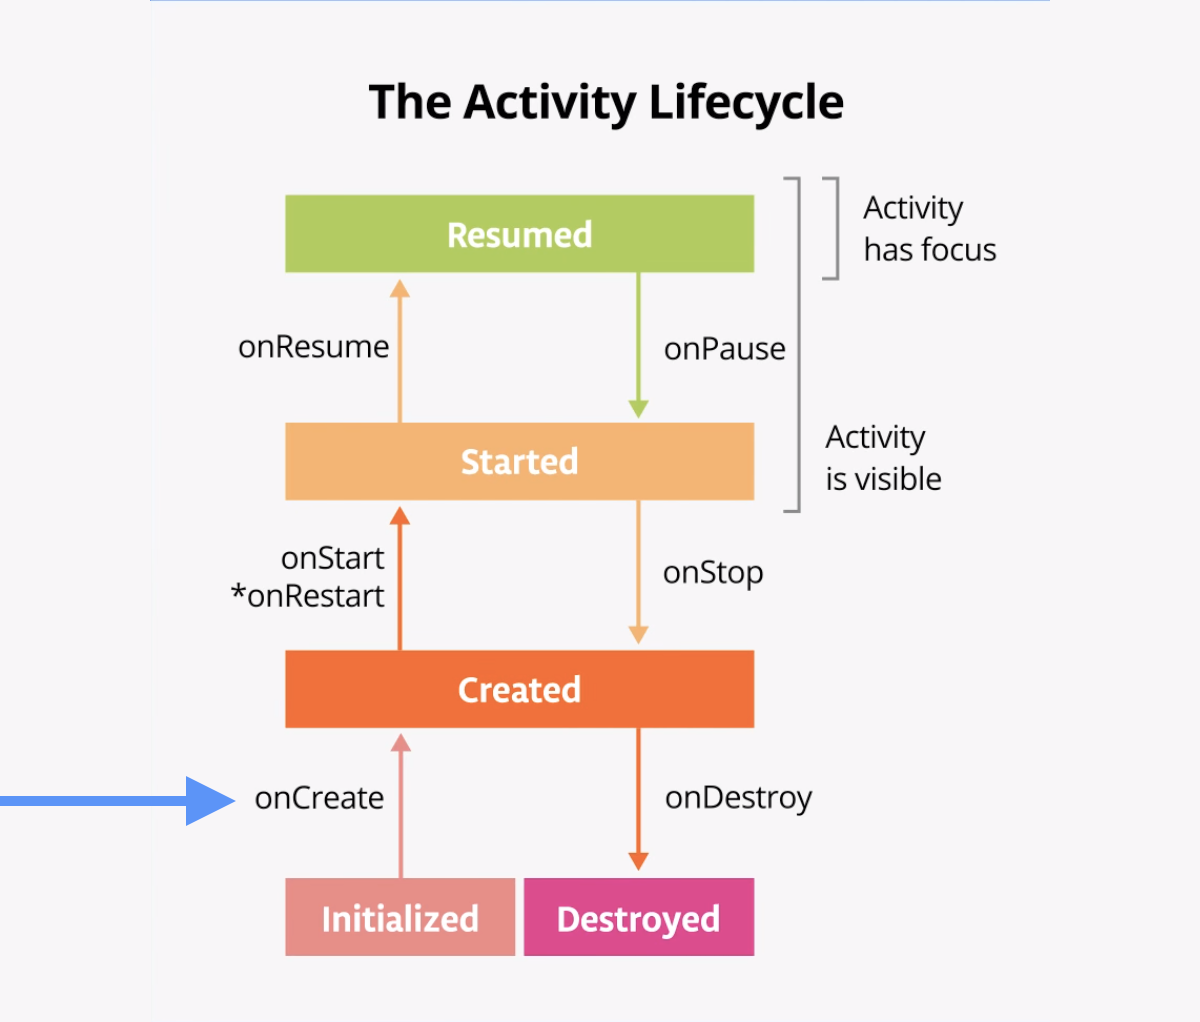
(10) Explain Activity lifecycle. Ans:
The Activity Lifecycle in Android refers to the various stages that an activity goes through during its existence, from creation to destruction. Understanding this lifecycle is crucial for managing an activity's state, preserving data, and handling resource management efficiently.
Here’s an overview of the key stages:
-
onCreate():
- This is the first method called when an activity is created. It's used to perform initialization, such as setting up the user interface with
setContentView(), initializing variables, and restoring previous states.
- This is the first method called when an activity is created. It's used to perform initialization, such as setting up the user interface with
-
onStart():
- This method is called when the activity is becoming visible to the user. At this point, the activity is not yet interactive, but it is in the foreground and ready to interact.
-
onResume():
- Called when the activity is in the foreground and interactive. The user can now interact with the activity. This is where you should begin tasks that require the activity to be active, like starting animations or sensors.
-
onPause():
- This method is triggered when the activity is about to go into the background. It is used for saving data, releasing resources, or stopping ongoing tasks that do not need to continue while the activity is not visible.
-
onStop():
- Called when the activity is no longer visible to the user. You should release heavy resources, stop background tasks, or save data. The activity may be killed at this point by the system if memory is low.
-
onRestart():
- This method is called when the activity is coming back to the foreground after being stopped. It's often used to reinitialize resources or restart tasks that were paused or stopped in
onStop().
- This method is called when the activity is coming back to the foreground after being stopped. It's often used to reinitialize resources or restart tasks that were paused or stopped in
-
onDestroy():
- Called before the activity is destroyed. This is the last chance to clean up resources, such as stopping threads, closing files, or releasing other system resources.
The activity lifecycle helps ensure proper memory management and user experience by allowing developers to manage resources, save and restore state, and respond to changes in the app’s environment.
Diagram of Activity Lifecycle:
(11) Write a note on Intent and Broadcast receiver. Ans:
Intent and Broadcast Receiver in Android
Intent:
An Intent is an abstract description of an operation to be performed in Android. It is used for communication between components such as activities, services, and broadcast receivers. There are two main types of intents:
- Explicit Intent: Specifies the target component (e.g., starting a specific activity or service).
- Implicit Intent: Does not specify a target component, instead, it declares an action to be performed, and the system finds an appropriate component to handle it.
Broadcast Receiver:
A Broadcast Receiver is a component that listens for and reacts to broadcast messages from other applications or the system. It enables an application to respond to global system events (like Wi-Fi changes, battery status) or custom events sent by other apps. A broadcast receiver is registered either in the manifest file or at runtime.
- Manifest Registration: The receiver is declared in the AndroidManifest.xml file.
- Runtime Registration: The receiver is registered in the code with the help of
registerReceiver()method.
Usage:
- Intents are used to invoke activities, services, or deliver broadcasts.
- Broadcast Receivers handle broadcasted messages and allow apps to perform specific tasks based on the received messages.
Intent facilitates component communication, and Broadcast Receivers help applications respond to broadcasted events. Both are essential for inter-process communication in Android.
(12) Explain Architecture of android with a neat diagram.
Ans:

The architecture of an Android application is organized in layers that work together to allow the system to function efficiently. Here's an overview of the architecture with a breakdown of each layer:
1. Linux Kernel
- The foundation of Android, providing essential system functions such as memory management, process management, and hardware drivers.
- Acts as an interface between the hardware and higher-level software components.
2. Hardware Abstraction Layer (HAL)
- A layer that provides standard interfaces for hardware components like cameras, sensors, and GPS, allowing Android to interact with hardware devices without knowing their specifics.
3. Android Runtime (ART)
- This layer includes the Android Runtime (ART), which runs and manages Android apps.
- Includes core libraries that provide a set of Java-like APIs for use in Android applications.
4. Libraries
- A set of native libraries that Android apps can use, including libraries for graphics, data storage, web browsing, and more. Notable libraries include WebKit, OpenGL, SQLite, etc.
5. Application Framework
- Provides essential APIs for Android app developers, such as UI management, resource management, content providers, and system services.
- Key components include:
- Activity Manager: Manages the lifecycle of activities (UI screens).
- Window Manager: Manages the windows displayed on the screen.
- Content Providers: Enable data sharing between applications.
- View System: Handles the UI elements and layouts of the app.
6. Applications
- The topmost layer where user-installed applications reside. These applications interact with the system via the APIs exposed by the application framework.
(13) Explain Services in Android. Ans:
In Android, a Service is an application component that can perform long-running operations in the background without interacting with the user interface (UI). Services run independently from the main activity and can continue running even if the user switches to another application.
Types of Services:
-
Started Service: A service is started when an application component (like an activity) calls
startService(). Once started, the service can run indefinitely and is stopped either by the service itself or by callingstopService(). -
Bound Service: A service is bound when an application component (like an activity) calls
bindService(). A bound service allows components to communicate with it, and it only runs as long as there are clients bound to it. It stops when no components are bound. -
IntentService: A special type of service designed to handle asynchronous requests (i.e., requests sent via
startService()), each handled in a worker thread. It automatically stops when all work is complete.
Key Methods in a Service:
onCreate(): Called when the service is created. It is used for initializing resources.onStartCommand(): Called every time a service is started usingstartService(). It processes incoming requests in the background.onBind(): Used in bound services to return aBinderobject that clients can use to communicate with the service.onDestroy(): Called when the service is about to be destroyed. It is used for releasing resources and stopping background tasks.
Use Cases:
- Running background tasks: Services are commonly used for tasks such as playing music, downloading files, or performing network operations that should continue even if the user navigates away from the app.
- Remote processes: Services can communicate with other apps via inter-process communication (IPC).
Lifecycle:
The lifecycle of a service is simpler than that of an activity. It begins with onCreate(), continues with onStartCommand() (for started services), and ends with onDestroy().
(14) What is Firebase? List various features of the same. Ans:
Firebase is a platform developed by Google that provides a set of backend services to help developers build and manage mobile and web applications. It offers tools for authentication, real-time databases, cloud storage, and more, which simplify the development process and enhance the functionality of apps.
Features of Firebase:
-
Firebase Authentication: Provides a complete authentication system that supports email/password authentication, third-party login providers (like Google, Facebook, and Twitter), and anonymous authentication.
-
Firebase Realtime Database: A NoSQL cloud database that enables the storage and synchronization of data in real-time between users. It is particularly useful for chat applications, collaborative apps, and other apps requiring instant data updates.
-
Firebase Cloud Firestore: A flexible, scalable NoSQL cloud database for building web, mobile, and server applications. Unlike the Realtime Database, it is more structured and offers powerful querying capabilities.
-
Firebase Cloud Messaging (FCM): Allows developers to send push notifications to users across platforms (Android, iOS, Web), enabling direct communication with users even when the app is not in the foreground.
-
Firebase Cloud Storage: Provides easy-to-use and secure file storage for user-generated content like images, videos, and other files. It is integrated with Firebase Authentication for secure access control.
These features, along with others like Firebase Hosting, Firebase Analytics, and Firebase Remote Config, make Firebase an all-in-one backend service for developers.
(15) What is spinner ? Explain with example. Ans:
A Spinner in Android is a UI widget that allows users to select an item from a dropdown list. It is similar to a combo box in other programming environments and is often used when there are multiple options available, but the user only needs to choose one. The Spinner widget displays a single item in its normal state, but when clicked, it opens a dropdown to show the available options.
Key Points:
- Spinner provides a graphical interface for selecting a value from a list.
- It typically requires an Adapter to populate the dropdown items.
- It can be customized with different styles and layouts.
Example:
Here's an example of how to implement a Spinner in Android:
- XML Layout (activity_main.xml):
<LinearLayout xmlns:android="http://schemas.android.com/apk/res/android"
    android:layout_width="match_parent"
    android:layout_height="match_parent"
    android:orientation="vertical">

    <!-- Spinner widget -->
    <Spinner
        android:id="@+id/mySpinner"
        android:layout_width="wrap_content"
        android:layout_height="wrap_content"/>
</LinearLayout>
- Activity Code (MainActivity.java):
import android.os.Bundle;
import android.view.View;
import android.widget.AdapterView;
import android.widget.ArrayAdapter;
import android.widget.Spinner;
import android.widget.Toast;
import androidx.appcompat.app.AppCompatActivity;

public class MainActivity extends AppCompatActivity {

    @Override
    protected void onCreate(Bundle savedInstanceState) {
        super.onCreate(savedInstanceState);
        setContentView(R.layout.activity_main);

        // Initialize Spinner
        Spinner mySpinner = findViewById(R.id.mySpinner);

        // Sample data for Spinner
        String[] options = {"Option 1", "Option 2", "Option 3", "Option 4"};

        // Set up the Adapter
        ArrayAdapter<String> adapter = new ArrayAdapter<>(this, android.R.layout.simple_spinner_dropdown_item, options);
        mySpinner.setAdapter(adapter);

        // Set an item selected listener
        mySpinner.setOnItemSelectedListener(new AdapterView.OnItemSelectedListener() {
            @Override
            public void onItemSelected(AdapterView<?> parentView, View selectedItemView, int position, long id) {
                String selectedItem = parentView.getItemAtPosition(position).toString();
                Toast.makeText(MainActivity.this, "Selected: " + selectedItem, Toast.LENGTH_SHORT).show();
            }

            @Override
            public void onNothingSelected(AdapterView<?> parentView) {
                // Do nothing
            }
        });
    }
}
Explanation:
- XML Layout:
- A
Spinnerwidget is added to the layout with the IDmySpinner.
- A
- Activity Code:
- An
ArrayAdapteris used to bind the list of options to the Spinner. The adapter takes the context, a default layout resource for displaying items (simple_spinner_dropdown_item), and the data source (optionsarray). - An
OnItemSelectedListeneris set on the Spinner to detect which item the user selects. When an item is selected, a Toast message is displayed showing the selected item.
- An
Output:
When the application runs, the Spinner will display a dropdown list of options. When the user selects an option, a Toast message will show the selected item.
(16) Write an android application to implement DatePicker View. Ans:
Here's a simple Android application that demonstrates the implementation of a DatePicker view. The application will allow the user to pick a date and display it in a TextView.
1. XML Layout (activity_main.xml)
<?xml version="1.0" encoding="utf-8"?>
<LinearLayout xmlns:android="http://schemas.android.com/apk/res/android"
    android:layout_width="match_parent"
    android:layout_height="match_parent"
    android:orientation="vertical"
    android:padding="16dp">

    <TextView
        android:id="@+id/textViewDate"
        android:layout_width="wrap_content"
        android:layout_height="wrap_content"
        android:text="Selected Date will appear here"
        android:textSize="18sp"/>

    <Button
        android:id="@+id/buttonPickDate"
        android:layout_width="wrap_content"
        android:layout_height="wrap_content"
        android:text="Pick Date"
        android:layout_marginTop="20dp"/>

    <DatePicker
        android:id="@+id/datePicker"
        android:layout_width="wrap_content"
        android:layout_height="wrap_content"
        android:visibility="gone" />
</LinearLayout>
2. MainActivity.java
package com.example.datepickerviewexample;

import android.os.Bundle;
import android.view.View;
import android.widget.Button;
import android.widget.DatePicker;
import android.widget.TextView;
import androidx.appcompat.app.AppCompatActivity;

public class MainActivity extends AppCompatActivity {

    private TextView textViewDate;
    private Button buttonPickDate;
    private DatePicker datePicker;

    @Override
    protected void onCreate(Bundle savedInstanceState) {
        super.onCreate(savedInstanceState);
        setContentView(R.layout.activity_main);

        // Initialize Views
        textViewDate = findViewById(R.id.textViewDate);
        buttonPickDate = findViewById(R.id.buttonPickDate);
        datePicker = findViewById(R.id.datePicker);

        // Set OnClickListener to button
        buttonPickDate.setOnClickListener(new View.OnClickListener() {
            @Override
            public void onClick(View v) {
                // Show the DatePicker when the button is clicked
                datePicker.setVisibility(View.VISIBLE);
            }
        });

        // Set DatePicker listener
        datePicker.init(2025, 1, 18, new DatePicker.OnDateChangedListener() {
            @Override
            public void onDateChanged(DatePicker view, int year, int monthOfYear, int dayOfMonth) {
                // Format the selected date and display it
                String selectedDate = dayOfMonth + "/" + (monthOfYear + 1) + "/" + year;
                textViewDate.setText("Selected Date: " + selectedDate);
            }
        });
    }
}
3. Explanation
- DatePicker: This is a widget used to pick a date. It is initially hidden (
android:visibility="gone") and will only be shown when the user clicks the "Pick Date" button. - TextView: This will display the selected date.
- Button: When clicked, it will display the
DatePicker. - DatePicker OnDateChangedListener: This listener is triggered whenever the user selects a new date. It updates the
TextViewto display the selected date.
4. Manifest (AndroidManifest.xml)
Make sure the MainActivity is set in the AndroidManifest.xml as follows:
<application
    android:allowBackup="true"
    android:icon="@mipmap/ic_launcher"
    android:label="@string/app_name"
    android:theme="@style/Theme.AppCompat.Light.DarkActionBar">
    <activity android:name=".MainActivity">
        <intent-filter>
            <action android:name="android.intent.action.MAIN" />
            <category android:name="android.intent.category.LAUNCHER" />
        </intent-filter>
    </activity>
</application>
5. Result
When you run the application:
- A button with the text "Pick Date" will appear.
- When the button is clicked, a
DatePickerwill show up. - As the user picks a date, the selected date will be displayed in the
TextViewbelow the button.
This implementation demonstrates a simple use case of DatePicker in an Android application, perfect for a small example.
(17) Write the code for accepting user name and password from the user. Ans:
To accept a username and password from the user in Android, you typically use an EditText for user input and a Button to trigger the action (e.g., login). Here's an example code snippet for an Android app that takes the username and password from the user:
1. XML Layout (activity_main.xml)
<?xml version="1.0" encoding="utf-8"?>
<RelativeLayout xmlns:android="http://schemas.android.com/apk/res/android"
    android:layout_width="match_parent"
    android:layout_height="match_parent"
    android:padding="16dp">

    <!-- Username Input -->
    <EditText
        android:id="@+id/username"
        android:layout_width="match_parent"
        android:layout_height="wrap_content"
        android:hint="Enter Username"
        android:inputType="textPersonName"
        android:layout_alignParentTop="true"/>

    <!-- Password Input -->
    <EditText
        android:id="@+id/password"
        android:layout_width="match_parent"
        android:layout_height="wrap_content"
        android:hint="Enter Password"
        android:inputType="textPassword"
        android:layout_below="@id/username"
        android:layout_marginTop="16dp"/>

    <!-- Login Button -->
    <Button
        android:id="@+id/loginButton"
        android:layout_width="wrap_content"
        android:layout_height="wrap_content"
        android:text="Login"
        android:layout_below="@id/password"
        android:layout_marginTop="16dp"/>

</RelativeLayout>
2. Java Activity Code (MainActivity.java)
package com.example.loginapp;

import android.os.Bundle;
import android.view.View;
import android.widget.Button;
import android.widget.EditText;
import android.widget.Toast;
import androidx.appcompat.app.AppCompatActivity;

public class MainActivity extends AppCompatActivity {

    private EditText usernameEditText, passwordEditText;
    private Button loginButton;

    @Override
    protected void onCreate(Bundle savedInstanceState) {
        super.onCreate(savedInstanceState);
        setContentView(R.layout.activity_main);

        // Initialize UI components
        usernameEditText = findViewById(R.id.username);
        passwordEditText = findViewById(R.id.password);
        loginButton = findViewById(R.id.loginButton);

        // Set the OnClickListener for the login button
        loginButton.setOnClickListener(new View.OnClickListener() {
            @Override
            public void onClick(View v) {
                // Get the username and password entered by the user
                String username = usernameEditText.getText().toString().trim();
                String password = passwordEditText.getText().toString().trim();

                // Validate input
                if (username.isEmpty() || password.isEmpty()) {
                    Toast.makeText(MainActivity.this, "Please enter both username and password", Toast.LENGTH_SHORT).show();
                } else {
                    // For demonstration, we'll show a success message
                    // In a real app, you would authenticate the credentials
                    Toast.makeText(MainActivity.this, "Login successful", Toast.LENGTH_SHORT).show();
                }
            }
        });
    }
}
Explanation:
- EditText for Username and Password: The
EditTextfields are used to take user input for the username and password. - Button for Login: The
Buttontriggers the login process when clicked. - Validation: The input fields are validated to check if both username and password are entered. If either is empty, a Toast message will be displayed asking the user to enter both.
- Toast Message: This is used to display feedback to the user, such as a success message after the user enters the credentials.
(18) What do you mean by menu ? How do you create the same ? Provide one small XML example. Ans:
In Android, a menu refers to a set of options or commands that users can select to perform various tasks within the app. It is typically displayed as a set of icons, text, or a combination of both, depending on the device's interface (either in the app's action bar, toolbar, or as a pop-up menu).
There are two types of menus in Android:
- Options Menu – Appears when the user presses the Menu button on the device (typically the 3-dot icon on the action bar).
- Context Menu – Appears when the user long presses on a view or item.
Creating a Menu in Android
Menus in Android are defined in XML files located in the res/menu/ directory. Once created, the menu is inflated (i.e., displayed) in the activity by overriding the onCreateOptionsMenu() method.
Example of an XML Menu File
Here's a simple example of an options menu defined in XML:
- Create a menu XML file (e.g.,
menu_example.xml):
<?xml version="1.0" encoding="utf-8"?>
<menu xmlns:android="http://schemas.android.com/apk/res/android">
    <item
        android:id="@+id/action_settings"
        android:title="Settings"
        android:icon="@drawable/ic_settings"
        android:showAsAction="ifRoom"/>

    <item
        android:id="@+id/action_help"
        android:title="Help"
        android:showAsAction="never"/>
</menu>
- Inflating the Menu in Your Activity (e.g.,
MainActivity.java):
@Override
public boolean onCreateOptionsMenu(Menu menu) {
    // Inflate the menu resource file
    getMenuInflater().inflate(R.menu.menu_example, menu);
    return true;
}
In this example:
- The first item (
action_settings) will show as an icon in the action bar if there's room for it. - The second item (
action_help) will only appear in the overflow menu (three dots) because ofandroid:showAsAction="never".
Explanation of XML attributes:
android:id: A unique identifier for the menu item.android:title: The text label for the menu item.android:icon: The icon displayed alongside the menu item.android:showAsAction: Specifies whether to display the item as a button on the action bar (ifRoommeans it will only appear if there's enough space).
(19) Explain Life cycle of service in android. Ans:
The Life Cycle of a Service in Android is crucial for understanding how services are managed by the Android system. Here's an explanation of the service life cycle for 5 marks:
-
onCreate():
- This method is called when the service is first created. It's where you perform one-time initializations like setting up resources or registering listeners. The service is not yet running at this point.
-
onStartCommand():
- This method is called when a client (like an Activity or another service) calls
startService(). It runs the service in the background. You typically place logic to process requests or perform long-running tasks in this method. - It returns an integer value indicating how the system should handle the service if it gets killed. The possible return values are:
START_STICKY: The service will be restarted if it gets terminated.START_NOT_STICKY: The service will not be restarted if it's terminated.START_REDELIVER_INTENT: The service will restart, and the previous Intent will be delivered to it.
- This method is called when a client (like an Activity or another service) calls
-
onBind():
- This method is called when another component (like an Activity) binds to the service using
bindService(). It provides an interface for clients to interact with the service. This method must return anIBinderobject, which clients use to communicate with the service. - If the service is started (not bound),
onBind()is not called.
- This method is called when another component (like an Activity) binds to the service using
-
onUnbind():
- This method is called when all clients have unbound from the service. It allows the service to clean up any resources related to the binding. If the service is still running, it will continue to function independently of the client.
-
onDestroy():
- This method is called when the service is no longer needed and is being destroyed. It’s where you should release resources, unregister listeners, or stop any ongoing tasks. This can happen either when
stopService()is called or whenonStartCommand()returns a signal to stop the service.
- This method is called when the service is no longer needed and is being destroyed. It’s where you should release resources, unregister listeners, or stop any ongoing tasks. This can happen either when
- Services can be Started (via
startService()), Bound (viabindService()), or both. When bound, the service provides a communication channel for clients. - Started services run indefinitely until explicitly stopped, while Bound services run as long as clients are bound to them.
(20) Write a note on Drawables in android. Ans:
Note on Drawables in Android
In Android development, Drawables are resources that define images, shapes, or other graphic content that can be drawn to the screen. They play a crucial role in the design and appearance of the app's UI elements, such as buttons, backgrounds, and icons. Drawables in Android are a powerful tool that can help you create flexible and dynamic interfaces. Here are the main types of drawables used in Android:
-
Bitmap Drawables: These drawables are used to store image files such as PNG, JPG, and GIF. Bitmap drawables are usually created from image files or resources and are used in ImageViews or as background images for layouts.
-
Shape Drawables: Shape drawables allow you to create simple geometric shapes such as rectangles, circles, ovals, or lines. You define them using XML in the
res/drawablefolder, allowing for customized colors, borders, and gradients. -
State List Drawables: State list drawables change their appearance based on the state of a UI element, such as a button or an image. For example, you can define different images or colors when a button is in its normal, pressed, or focused state.
-
Layer List Drawables: These drawables consist of multiple other drawables stacked on top of each other. Layer list drawables are useful for creating complex images with multiple components or overlay effects.
-
Nine-Patch Drawables: Nine-patch images are special types of PNG images that can stretch in certain areas while keeping other parts intact. These images are ideal for creating scalable UI elements, such as buttons and backgrounds, that need to adjust to various screen sizes and resolutions.
-
Gradient Drawables: These drawables are used to create smooth transitions between colors. They can be linear, radial, or sweep gradients and are commonly used for backgrounds or UI effects.
Usage:
Drawables are referenced in XML layouts through attributes like android:background, android:src, and android:drawableLeft, depending on the view type. They can also be manipulated in Java or Kotlin code through Drawable class methods, allowing for dynamic changes.
(21) What is a Broadcast Receiver in android? Explain. Ans:
A Broadcast Receiver in Android is a component that listens for and responds to system-wide broadcast messages or events. These broadcasts can be triggered by the system itself or by other applications. A Broadcast Receiver allows your app to receive messages about events such as battery changes, network connectivity, or even custom events sent by other apps.
Key points :
-
Definition: A Broadcast Receiver is a special component in Android that listens for specific events (broadcasts) and reacts to them.
-
Types of Broadcasts: There are two main types of broadcasts:
- Normal broadcasts: These are sent to all receivers and delivered asynchronously.
- Ordered broadcasts: These are sent to receivers in a specific order and allow for prioritization and permission control.
-
Usage: Common use cases include:
- Detecting system events like battery low, network status changes, or screen on/off.
- Listening for custom events from other applications.
-
Lifecycle: The lifecycle of a Broadcast Receiver is short-lived. When an event occurs, the system invokes the
onReceive()method, and after processing the event, the receiver is destroyed. -
Registration:
- Static Registration: Done in the
AndroidManifest.xml, where the app declares the broadcast receivers it wants to listen for. - Dynamic Registration: Done at runtime using
registerReceiver(), which allows the receiver to be registered or unregistered as needed.
- Static Registration: Done in the
Example:
public class MyReceiver extends BroadcastReceiver {
    @Override
    public void onReceive(Context context, Intent intent) {
        // Handle the broadcast here
        Log.d("MyReceiver", "Received broadcast!");
    }
}
This would create a receiver that logs a message when it receives a broadcast.
(22) Write a note on Alarm Manager along with example. Ans:
Alarm Manager in Android
The AlarmManager class in Android is used to schedule your application to run at a specific time, either one-time or recurring, even if your application is not running. It allows the application to set alarms for different events, such as triggering notifications, waking up the app to perform background tasks, or performing network operations.
Key Features of AlarmManager:
- Triggering tasks at specific times: You can use AlarmManager to trigger tasks at specific intervals, even when the app is not running.
- Repeating alarms: You can set alarms to repeat at fixed intervals, useful for periodic tasks.
- Wake-up alarms: AlarmManager can wake up the phone from sleep mode if necessary (using
setExactAndAllowWhileIdle()orsetWindow()).
Types of Alarms:
- One-time alarm: Triggers an event at a specific time.
- Repeating alarm: Triggers the event repeatedly at a fixed interval.
Example Code:
import android.app.AlarmManager;
import android.app.PendingIntent;
import android.content.BroadcastReceiver;
import android.content.Context;
import android.content.Intent;
import android.os.Bundle;

public class MainActivity extends AppCompatActivity {

    @Override
    protected void onCreate(Bundle savedInstanceState) {
        super.onCreate(savedInstanceState);
        setContentView(R.layout.activity_main);

        // Create an AlarmManager instance
        AlarmManager alarmManager = (AlarmManager) getSystemService(Context.ALARM_SERVICE);

        // Create an intent for the broadcast receiver that will handle the alarm
        Intent intent = new Intent(this, AlarmReceiver.class);

        // Create a pending intent to be triggered by the alarm
        PendingIntent pendingIntent = PendingIntent.getBroadcast(this, 0, intent, 0);

        // Set the alarm to trigger after 5 seconds
        long triggerTime = System.currentTimeMillis() + 5000;

        // Use setExact() to ensure the alarm triggers at exactly the specified time
        alarmManager.setExact(AlarmManager.RTC_WAKEUP, triggerTime, pendingIntent);
    }
}

// Receiver to handle the alarm
public class AlarmReceiver extends BroadcastReceiver {

    @Override
    public void onReceive(Context context, Intent intent) {
        // Handle the alarm event, for example, show a toast or notification
        Toast.makeText(context, "Alarm triggered!", Toast.LENGTH_SHORT).show();
    }
}
Explanation of Example:
- AlarmManager Instance: We get an instance of AlarmManager via
getSystemService(). - PendingIntent: PendingIntent is created with the intent to execute when the alarm triggers. The PendingIntent will be sent to a BroadcastReceiver (
AlarmReceiver). - setExact(): This method schedules a one-time alarm that will trigger at exactly the specified time (
triggerTime). The alarm is set to wake the device if needed (RTC_WAKEUP). - AlarmReceiver: The receiver handles the alarm when it goes off and shows a simple toast message.
- Scheduling background tasks: For tasks like syncing data, updating notifications, etc.
- Reminders: Setting an alarm to remind users about an event at a specific time.
(23) Write a short note on Shared Preferences. Ans:
Shared Preferences is a mechanism in Android used for storing simple data in key-value pairs, typically for small amounts of information such as user settings, application preferences, or configuration data. It provides a lightweight and easy way to persist data across sessions. Shared Preferences are stored in XML files, and each file contains key-value pairs where the keys are strings, and the values can be booleans, floats, ints, longs, or strings.
To use Shared Preferences, Android provides the SharedPreferences interface, which includes methods to read and write data. The SharedPreferences.Editor is used to modify the values in the Shared Preferences file.
The main advantages of Shared Preferences are:
- Simple to implement: It offers an easy and straightforward way to save primitive data types.
- Persistence: Data remains available even after the application is closed or the device is restarted.
- Security: Data is stored in a private file, ensuring no unauthorized access by other apps.
However, Shared Preferences is not suitable for storing large data sets or complex data structures, in which case a database like SQLite should be used.
Example of using Shared Preferences:
SharedPreferences sharedPreferences = getSharedPreferences("userPreferences", MODE_PRIVATE);
SharedPreferences.Editor editor = sharedPreferences.edit();
editor.putString("username", "JohnDoe");
editor.putInt("age", 25);
editor.apply();
To retrieve the data:
String username = sharedPreferences.getString("username", "defaultName");
int age = sharedPreferences.getInt("age", 0);
In conclusion, Shared Preferences is ideal for storing small, simple data like user settings or flags in Android apps.
(24) Explain following with respect to database along with suitable example.
1)Insert 2)Select 3)Update 4)Delete 5)Cursor Ans:
Databases are typically managed using SQLite, which allows you to store, manipulate, and retrieve data efficiently. Let's explain the database operations you mentioned:
1) Insert
The Insert operation is used to add new records (rows) into a table in the database.
Example:
SQLiteDatabase db = dbHelper.getWritableDatabase();
ContentValues values = new ContentValues();
values.put("name", "John Doe");
values.put("email", "johndoe@example.com");

// Insert the new row
long newRowId = db.insert("users", null, values);
In this example, a new record is inserted into the users table with the name and email fields.
2) Select
The Select operation is used to query the database and retrieve data based on specific criteria.
Example:
SQLiteDatabase db = dbHelper.getReadableDatabase();
String[] projection = {
    "id",
    "name",
    "email"
};
String selection = "name = ?";
String[] selectionArgs = { "John Doe" };

Cursor cursor = db.query(
    "users",   // The table to query
    projection, // The columns to return
    selection, // The columns for the WHERE clause
    selectionArgs, // The values for the WHERE clause
    null,       // Don't group the rows
    null,       // Don't filter by row groups
    null        // Don't sort the rows
);

while (cursor.moveToNext()) {
    String name = cursor.getString(cursor.getColumnIndexOrThrow("name"));
    String email = cursor.getString(cursor.getColumnIndexOrThrow("email"));
    // Do something with the data
}
cursor.close();
This code retrieves data from the users table where the name is "John Doe."
3) Update
The Update operation is used to modify existing records in the database.
Example:
SQLiteDatabase db = dbHelper.getWritableDatabase();
ContentValues values = new ContentValues();
values.put("email", "johnnyd@example.com");

// Update the email for the user with ID 1
String selection = "id = ?";
String[] selectionArgs = { "1" };

int count = db.update(
    "users",
    values,
    selection,
    selectionArgs
);
Here, the email for the user with id = 1 is updated in the users table.
4) Delete
The Delete operation is used to remove one or more records from a table.
Example:
SQLiteDatabase db = dbHelper.getWritableDatabase();
String selection = "id = ?";
String[] selectionArgs = { "1" };

// Delete the user with ID 1
int deletedRows = db.delete("users", selection, selectionArgs);
In this case, the user with id = 1 is deleted from the users table.
5) Cursor
A Cursor is an object that provides a way to iterate through the results of a database query. It allows you to access the data row by row.
Example:
SQLiteDatabase db = dbHelper.getReadableDatabase();
String[] projection = {
    "id",
    "name",
    "email"
};

Cursor cursor = db.query(
    "users",
    projection,
    null, // No WHERE clause
    null, // No selection arguments
    null, // Don't group the rows
    null, // Don't filter by row groups
    null  // Don't sort the rows
);

while (cursor.moveToNext()) {
    int id = cursor.getInt(cursor.getColumnIndexOrThrow("id"));
    String name = cursor.getString(cursor.getColumnIndexOrThrow("name"));
    String email = cursor.getString(cursor.getColumnIndexOrThrow("email"));
    // Do something with the data
}
cursor.close();
Here, a Cursor is used to retrieve all rows from the users table and iterate through the data.
Summary:
- Insert: Adds a new record to the database.
- Select: Retrieves data from the database.
- Update: Modifies existing data in the database.
- Delete: Removes data from the database.
- Cursor: A pointer that allows you to iterate over query results.
(25) What is a content provider? How does it work? Ans:
A Content Provider is an Android component that allows applications to access and share data with other applications in a structured way. It is part of Android's architecture for managing and handling data between different apps.
How it works:
-
Data Sharing: Content providers allow apps to access and share data stored in different formats such as databases, files, or shared preferences. For example, a photo gallery app might expose its images via a content provider, so other apps can query or modify the images.
-
URI-based Access: Data access in content providers is managed through Uniform Resource Identifiers (URIs), which define the structure and location of the data. Apps interact with these URIs to request data or perform actions like insert, update, or delete.
-
CRUD Operations: Content providers typically support the four basic CRUD (Create, Read, Update, Delete) operations. Apps can invoke methods like
insert(),query(),update(), anddelete()to interact with the content provider and manipulate the data. -
Permissions: Content providers can be secured with permissions to restrict access to sensitive data. An app must declare permissions in the Android manifest file to access specific content providers.
-
Cursor Interface: The data retrieved from a content provider is often returned as a Cursor object, which allows apps to iterate over the data in a structured way (e.g., rows of a database).
content providers facilitate data sharing between Android applications in a secure, structured, and standardized manner using URIs, CRUD operations, and permissions.
(26) What are permissions in android? Write the relevant code to give permission to access camera and contacts to the application. Ans:
In Android, permissions are used to grant or deny an app access to system resources, such as the camera, contacts, location, and more. Permissions are declared in the AndroidManifest.xml file, and the app must request them at runtime for certain permissions (those classified as "dangerous" permissions).
Permissions in AndroidManifest.xml:
First, you need to declare the permissions in the AndroidManifest.xml file for accessing the camera and contacts.
<uses-permission android:name="android.permission.CAMERA"/>
<uses-permission android:name="android.permission.READ_CONTACTS"/>
Requesting Permissions at Runtime:
For dangerous permissions (like CAMERA and READ_CONTACTS), you must check and request permission at runtime. Here's how you can handle it in an activity:
import android.Manifest;
import android.content.pm.PackageManager;
import android.os.Build;
import android.os.Bundle;
import android.widget.Toast;
import androidx.appcompat.app.AppCompatActivity;
import androidx.core.app.ActivityCompat;
import androidx.core.content.ContextCompat;

public class MainActivity extends AppCompatActivity {

    private static final int CAMERA_PERMISSION_REQUEST_CODE = 1001;
    private static final int CONTACTS_PERMISSION_REQUEST_CODE = 1002;

    @Override
    protected void onCreate(Bundle savedInstanceState) {
        super.onCreate(savedInstanceState);
        setContentView(R.layout.activity_main);

        // Check permissions for CAMERA and READ_CONTACTS
        if (ContextCompat.checkSelfPermission(this, Manifest.permission.CAMERA) != PackageManager.PERMISSION_GRANTED) {
            ActivityCompat.requestPermissions(this, new String[]{Manifest.permission.CAMERA}, CAMERA_PERMISSION_REQUEST_CODE);
        }

        if (ContextCompat.checkSelfPermission(this, Manifest.permission.READ_CONTACTS) != PackageManager.PERMISSION_GRANTED) {
            ActivityCompat.requestPermissions(this, new String[]{Manifest.permission.READ_CONTACTS}, CONTACTS_PERMISSION_REQUEST_CODE);
        }
    }

    @Override
    public void onRequestPermissionsResult(int requestCode, String[] permissions, int[] grantResults) {
        super.onRequestPermissionsResult(requestCode, permissions, grantResults);

        if (requestCode == CAMERA_PERMISSION_REQUEST_CODE) {
            if (grantResults.length > 0 && grantResults[0] == PackageManager.PERMISSION_GRANTED) {
                Toast.makeText(this, "Camera permission granted", Toast.LENGTH_SHORT).show();
            } else {
                Toast.makeText(this, "Camera permission denied", Toast.LENGTH_SHORT).show();
            }
        }

        if (requestCode == CONTACTS_PERMISSION_REQUEST_CODE) {
            if (grantResults.length > 0 && grantResults[0] == PackageManager.PERMISSION_GRANTED) {
                Toast.makeText(this, "Contacts permission granted", Toast.LENGTH_SHORT).show();
            } else {
                Toast.makeText(this, "Contacts permission denied", Toast.LENGTH_SHORT).show();
            }
        }
    }
}
Explanation:
AndroidManifest.xml: Declare permissions to access the camera and contacts using<uses-permission>.ContextCompat.checkSelfPermission(): Check if the app already has the required permissions.ActivityCompat.requestPermissions(): Request permissions at runtime if they are not granted.onRequestPermissionsResult(): Handle the result of the permission request by checking if the permission was granted or denied.
(27) Identify and list key performance related recommendation for an android applications development.
Here’s a detailed explanation of the key performance-related recommendations for Android application development:
1. Optimize UI Rendering
- Use ConstraintLayout instead of deeply nested layouts to reduce UI complexity and improve rendering performance.
- Avoid overdraw by reducing redundant background elements and using appropriate UI components.
- Use RecyclerView for displaying large lists instead of ListView, as it provides better memory management and smooth scrolling.
- Enable hardware acceleration where needed to enhance graphical performance.
2. Efficient Memory Management
- Avoid memory leaks by properly managing Context references, especially in long-lived objects like Singleton classes.
- Use WeakReferences or Lifecycle-aware components (LiveData, ViewModel) to manage memory efficiently.
- Recycle Bitmaps and use appropriate image loading libraries like Glide or Picasso to handle image caching.
- Monitor memory usage using Android Profiler and optimize heap allocation.
3. Reduce Battery Consumption
- Optimize background processes using WorkManager, JobScheduler, or Foreground Services to schedule tasks efficiently.
- Avoid keeping the CPU awake unnecessarily by minimizing the use of WakeLocks.
- Use Doze Mode and App Standby effectively to reduce battery drain when the app is in the background.
- Reduce the frequency of location updates and network calls to preserve battery life.
4. Optimize Network Calls
- Use efficient APIs like Retrofit or Volley to make network requests more effective.
- Enable caching for frequently accessed data to reduce repeated network calls.
- Use Gzip compression to reduce data transmission size and improve response speed.
- Avoid synchronous network calls on the main thread to prevent UI lag and ANR (Application Not Responding) errors.
5. Improve App Launch Time
- Load essential resources asynchronously and use a lazy loading approach to initialize components only when needed.
- Optimize Application Class and avoid heavy initializations that delay app startup.
- Reduce the number of third-party libraries that are loaded during app launch.
- Use profiling tools like Android Studio’s Startup Profiler to identify and resolve slow initialization points.
Comments
Post a Comment